8.7 KiB
| title | date | author | draft | layout | tags |
|---|---|---|---|---|---|
| Embedded Basics | 2020-07-06T00:00:00 | Felix Queißner | false | tutorial.html |
Embedded Programming
In this tutorial, you'll learn the ways of the embedded programmer and how to master your MCU.
Prerequisites
Contents
Differences to desktop programming
The embedded world is quite different compared to the convenient environment of desktop computers. You are not protected by an operating system, you don't have convenient APIs for file access or even an allocator. You are as close to the metal as it can be.
Most of your programs don't even have a real entry point, as an embedded system is usually "started" by triggering
the RESET interrupt (which is some kind of callback). Desktop programs also have a protected memory area, where the
address 0x00…00 is usually invalid and cannot be accessed. On embedded systems though, this address is either where
some relevant data is or even more important, your entry point. You usually also have very little RAM available, sometimes
even less than 2048 byte. This means that thinking about memory usage is very important.
Inventory of an embedded programmer
Every embedded programmer requires some materials to get their work done efficiently.
First of all, the SOC datasheet. It contains all relevant information about the SOC/chip you are using, which functions each pin of the package has, where your RAM and flash is located in the memory map and so on. You will learn to navigate this document very quickly, as it's the main reference for everything you do.
Second, you need the schematics of the device you want to program. You usually can obtain them from the manufacturer of your development board (assuming you are using one), by the vendor of the device you're hacking (if you are lucky enough) or by reverse engineering the device you have at hands (consider this the hard mode of embedded development). Reading a schematic is crucial to get your device do what you want, and you can learn a bit about this in the Embedded Basics tutorial.
These two documents are the ones you definitly need and it's near-impossible to work without them. But usually you need more documents than this:
Datasheets for all the peripherial devices like displays, display controllers, motor controllers, expander chips and so on. Another document that helps a lot is the CPU datasheet for the core of your SOC. This document contains a precise description of the startup procedure of your system, what instructions are available, how the interrupts work in detail and similar topics.
And last, but not least: You need a text editor of your choice, a toolchain which consists of a compiler and binutils, and a programmer/flashing tool for your SOC, so you can load your program.
The startup procedure
So to get an embedded program up and running, we first need to check out the memory map in the datasheet. These usually look like this:
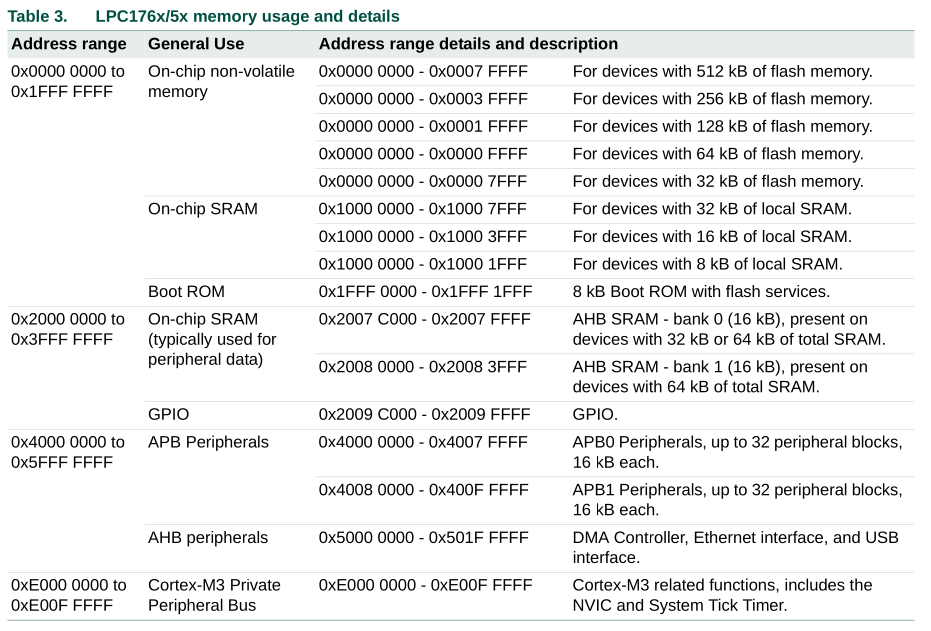
Here you can see that the memory contains continuous flash memory (On-chip non-volatile memory), two sections of SRAM (On-chip SRAM), some Boot ROM, and peripherials.
This memory map tells us how to design the linker script and how to lay out our sections (.text, .data, …). As sections are quite complex topic for themselves, they will be explained later. For now, we only need to know that .text is all of our code (this is where our functions live), .rodata is pre-initialized immutable data, .data is the pre-initialized mutable data and .bss is zero-initialized mutable data.
Note the difference between .rodata and .data? We can safely put .rodata into a flash section in memory, as we can access flash memory the same as we can access RAM. .data must be in RAM though, as we need to be able to change it. But there is one huge problem:
The RAM will contain garbage after startup. Our variables aren't initialized and thus also contain garbage. So the first thing to do in a microcontroller software is somehow restoring the data in RAM and initialize both known and zero-initialized data.
To do this, we first have to tell the compiler to store our pre-initialized data somewhere in flash memory, so we can copy it into RAM at startup. This is done via the linker script:
/* This section declares two memory regions:
 * flash: 512k of non-writeable memory at position 0,
 * ram:   32k of writeable memory at position 256M
 */
MEMORY
{
  flash (rx!w) : ORIGIN = 0x00000000, LENGTH = 512k
  ram   (rwx)  : ORIGIN = 0x10000000, LENGTH = 32k
}

/* This section declares rules where to put different
 * symbols (functions and variables) in memory
 */
SECTIONS
{
  /* this is the output section ".text" which will be located in flash */
  .text :
  {
    /* include all things that are functions or have linksection(".text") */
    *(.text)
  } >flash /* this means that this section is layed out in "flash" MEMORY */

  /* assign the current location to a symbol called code_end */
  code_end = .;

  /* this is the output section ".data" which will be located in RAM.
   * AT(X) means that this section is *loaded* at position X in memory, in this
   * case: after our code in flash.
   */
  .data : AT (code_end)
  {
    /* create a symbol called data_begin at the start of the data section */
    data_begin = .;

    /* include all things that are variables or have linksection(".data") */
    *(.data)

    /* same as above, but now at the end of the section */
    data_end = .;
  } >ram /* this means that this section is layed out in "ram" MEMORY */
}
This script includes all symbols from .text and .data in the final executable and assigns addresses from everything in .text to the flash memory and from everything in .data into the RAM. The section .data will have a different load address though: It is located directly behind .text and is not located at 0x10000000.
As most people have never heard of the load address, here's a short excourse: When linking a program, two things happen:
- Objects get assigned a address in memory (link address)
- Objects get a position where they are loaded (load address)
On a normal desktop program, these two are the same. In our embedded world, we need to "load" the RAM contents into flash though, as RAM cannot store the data. This means that when we link our program, the linker will treat everything in .data as it would be stored in RAM (and puts the symbol address there), but will actually store the data into the flash (and will store the bits there).
With this linker script, we now know two things: Everything in .data must be at the address of data_begin (which is in RAM), but is still located at code_end. Thus, we have to copy the memory from flash to RAM:
const std = @import("std");

// We can access symbols by declaring them as extern c_void
// and taking their address
extern var code_end: c_void;
extern var data_begin: c_void;
extern var data_end: c_void;

extern fn _start() callconv(.Naked) noreturn {
  // first, gather both source and destination addresses:
  const src_ptr = @ptrCast([*]const u8, &code_end);
  const dst_ptr = @ptrCast([*]u8, &data_begin);

  // then, compute the length of the .data section by
  // just subtracting two pointers
  const length = @ptrToInt(&data_end) - @ptrToInt(&data_start);

  // and finally, initialize .data:
  std.mem.copy(u8, dst_ptr[0..length], src_ptr[0..length]);

  // call your program enty point here:
  // …
}
There's two sections i left out:
.rodata, which is just made the same way as .text and will reside in flash and .bss which is similar to .data, but doesn't have initial content and can just be set to zero with std.mem.set(u8, bss_ptr[0..bss_length], 0).
As you might have noticed, we have a function called _start. This is our programs entry point and must never return, otherwise bad things will happen (and arbitrary code will be executed). Make sure to always include some endless loop that disables interrupt for safety here!
But you might wonder: How is this entry point called? This is very SOC-dependent and is explained in the respective tutorials for each SOC. The same is true for setting up the stack pointer which is required for calling functions and storing temporary variables.